![[Now the best OS/2 email software you can buy is free (click here for details)]](innoval.gif)
![[Now the best OS/2 email software you can buy is free (click here for details)]](innoval.gif)
| Chris' ColorWorks Powertips | - by Chris Wenham |
Masks can be downright handy for creating images that use multiple patterns or that combine multiple source images together in a controlled manner. ColorWorks 2.0 introduced the ability to use 8-bit masks, which were like the existing protection masks except that it could handle up to 256 levels of opacity. Painting with an opacity gradient is very similar to an 8-bit mask (and in fact is pretty much like an instant 8-bit mask) where the strength of the effect you're painting with diminishes as the gradient gets weaker. You'll see an example of this later on too.
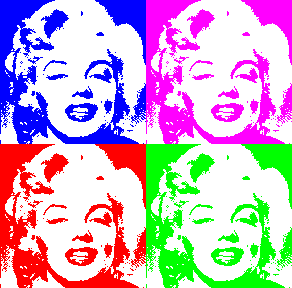
![[The Marilyn mask ]](marilyn1.gif) To get a visual idea of what they do, let's start with a simple mask to 'stamp out' multicolored copies. Here we have a simple black-n-white negative image of a movie star.
To get a visual idea of what they do, let's start with a simple mask to 'stamp out' multicolored copies. Here we have a simple black-n-white negative image of a movie star.
This image was saved as an 8-bit mask from the File.Save Resource.8-bit Mask menu. After that I switched to a blank canvas, chose Effects.8-bit Mask and picked Miss Monroe from the menu, making sure the mask was set to Tiled. After a bit of playing around with the rectangle tool and some colors I was done with the finished image seconds later:

(This will go well framed and hung next to my Boulevard of Broken Dreams picture...)
What you can see here is that anywhere on the mask that was white is where color showed through when we painted. Black areas on the mask allowed no color to be applied at all.
Since it's an 8-bit mask we could also have had gray areas, where color would have shown through with one of 254 different levels of opacity. This is what makes the 8-bit mask really powerful, because it's those subtle shades of gray that are used to smooth out the edges of lines and make them appear less jaggy. (Also known as anti-aliasing -- you've heard me harp on about that before, and you will again in the future, I promise).
The following is an example where I have taken some crisply anti-aliased text from Embellish and defined it as a mask in ColorWorks to re-create the same effect I did for the OS/2 Supersite's title graphic.
I started with a source image (JPG, 6.7k) that was a simple evening photograph of a city skyline (Seattle, if you must know). First I made a copy of the canvas and started reddening the hues (JPG, 6k) using the Effects.Tune Image Colors.Color Balance effect. This became the source image for the lettering.
Opening Embellish I created the text to be used in the final image. Embellish's anti-aliasing is much better than that in ColorWorks, in my opinion. All that was needed to transfer the image between the two programs was a simple cut-n-paste. Once in ColorWorks, I pasted two copies into the workspace, used Effects.Tune Image Colors.Invert to invert the second copy and then save it as an 8-bit mask. The original black-on-white text was passed through the Image.Plug-in Effects.Motion Blur effect, using down and left motion of 10 pixels to give me a shadow.
Next up was to create a new canvas of the same width and height as our source image of the skyline. Using the gradient and cloning effect (the cloning effect picked while the focus was on my original source image of the skyline) I painted to the new canvas with the full-canvas too, making a faded out copy of the skyline.
![[Anti-aliased text, inverted and saved as 8-bit mask]](megamask.gif)
![[Skyline painted with a fading gradient]](stage1.jpg)
![[Motion-blurred shadow of text applied to skyline]](stage2.jpg)
![[Finished result]](stage3.jpg)
Onto this faded skyline, a floated copy of the "MEGASITE!" text shadow is pasted with the If Darker setting of the Edit.Float Merge Control dialog.
Now the important part with the mask: all effects are first cleared, then the inverted 8-Bit mask of the text I made with Embellish is selected. With the red-tinted version of the skyline selected I apply the Effects.Clone effect. I switch back to the canvas where I've been assembling components and just paint that cloned image on with the full canvas tool. Since that 8-bit mask is switched on, the cloned image is painted in exactly the right place, complete with crisp and professional looking anti-aliased edges.
As mentioned, stay tuned to future columns for more cool multi-application graphics tricks to make your work really shine.
[Our Sponsor: Keller Group Inc. - Developers of FaxWorks for OS/2 and PMfax.]
Copyright © 1997 - Falcon Networking
This page is maintained by Falcon Networking. We welcome your suggestions.