| Chris's ColorWorks Power Tips | - by Chris Wenham |
 he purpose of this new monthly column is to help anyone with SPG's ColorWorks product (any version) learn how to be more creative. Creativity is a resource that we all have, but the way to get it out of the soup that swims in our heads and into the real world is by using
the right tools. And any complex and powerful tool needs to be learned properly if one is to get the best results.
he purpose of this new monthly column is to help anyone with SPG's ColorWorks product (any version) learn how to be more creative. Creativity is a resource that we all have, but the way to get it out of the soup that swims in our heads and into the real world is by using
the right tools. And any complex and powerful tool needs to be learned properly if one is to get the best results.
ColorWorks is often a whole new paradigm when it comes to creating artwork on the computer screen. In fact, most of its techniques have been in use by artists using traditional media for years, but it hasn't been until ColorWorks that the same methods have been implemented so gracefully on the computer.
The tips found in this column will come from a number of sources. Some of them will be from us, others will come from the guys at SPG themselves, and the rest will come from you--the reader. We plan on answering any questions you may have about ColorWorks and how to create certain effects with ColorWorks in these pages, as well as publishing any tips you have found and would like to share. Any tips and questions should be sent to the editor (he'll forward them to me like all good editors do).
A note about versions: Some tips will only be of use to users of ColorWorks V2 because the techniques can only be applied with the features found in this version. Users of ColorWorks v1+ needn't worry, we'll have plenty of tips that you can use too! The tips in this issue have only been tested with ColorWorks V2, however, since a copy of 1.0+ was not available at the time of writing.
A note about terms: Text marked in Bold represents menus, menu options, radio buttons and checkboxes. Menu options are dot-notated, so for example, to save a file you'd pick File.Save. As we go on, we'll start to assume you're getting the hang of ColorWorks' menu structures and controls and these helpers will be mentioned less often. And, of course, you'll always be able to refer back to past installments of this column since back issues of OS/2 e-Zine! remain on-line and off-line copies are always freely available.
Let's roll...
To get the ball rolling we need a ball to roll. ;-)
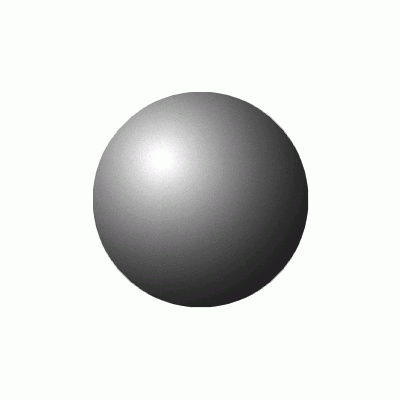
You can make a sphere or ball of any size by using the new gradient tool of ColorWorks 2.0. The trick is to simulate a light source shining on a spherical object. If you were to look at the silhouette of a sphere you'd see that it is just a black circle, but when light is added to the front of the ball, you perceive depth.
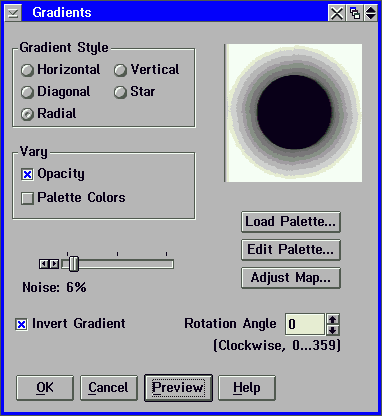
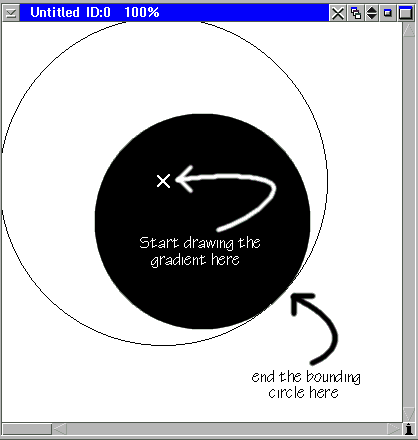
To start, create a new file (File.New), make sure no effects are in use (Effects.Clear All Effects if it isn't greyed out), then use the circle tool to draw a filled circle (GIF 4.5k) in the middle of the new canvas. Make it about half the diameter of the window. Now open the Gradients effects box (GIF 9.7k) (Effects.Gradients...). Pick the Radial gradient (since the object is circular, the light shining on it will spread out in a circular pattern) and make
sure only the Invert Gradient and Opacity boxes are checked (make sure Palette Colors is unchecked).
Now click on OK and pick a white color from the palette box. Still using the circle tool, draw a circle (GIF 7.6k) starting from the top-leftish corner of the first circle and draw the radius out until it encompasses the original. After you release the mouse button, ColorWorks will draw a radial gradient in white while decreasing the opacity steadily outwards. Voila, an instant sphere (GIF 17k)!
This gradient simulates a light source to create a reflection on the sphere slightly offset from the center, fooling the eye into perceiving a third dimension that isn't really there.
Tips for improving...
Q&A Center
In the coming months we'll be answering your letters and helping to solve your creativity problems with ColorWorks. Trying to create a certain special effect? Want to know if ColorWorks can do the job you're looking for? Send a letter to the editor describing your problem and we'll put our heads together to solve it. We'll print selected letters and their solutions here.
"My old paint program, MegaBrush, had a 'bitmap fill' feature that let me floodfill any area using a bitmap as the source. How can I do this with ColorWorks?"
- Joe Anybody, Somewhere, Idano.
Joe, in ColorWorks you'd use the Effects.Clone effect and then paint with the floodfill tool. Open the bitmap you wish to use as a source (using File.Open), make sure the new window is active, pick the Effects.Clone effect and when the dialog comes up, click on Ok (you don't need to worry if it's Aligned or Non Aligned). Now pick the floodfill tool and go to the window you want to paint to. Point the cursor to the area you want to fill and click the left mouse button. ColorWorks will fill the area using the bitmap as the source.
Note that you can also use any of the other filled tools to draw an object filled with the source image too.
(Joe Anybody doesn't really want to be the only person appearing on these pages, so please start sending us your questions!)
Readers Tips
Readers who've discovered their own neat tips and want to share them with others should send them in to be published here.
Download Depot
The Download Depot is where we'll be posting a whole slew of stuff you can download and use with ColorWorks. Textures, Pixel Displacement Maps, Graphics States, Gradient Maps, Plug-Ins and any other ColorWorks related file that may be of use to you.
dentripl.txr - "Dented Ripples" texture (16.4k). Download to your x:/CWORKS/TEXTURE directory (where "x:" is the drive you installed ColorWorks on).
ColorWorks Culture
This section is about humorous, strange and interesting things that we discover about ColorWorks.
For me I found reviewing ColorWorks V2 to be a very spooky experience.
In my review of ColorWorks v1.0, I changed a blue car to green to demonstrate the use of the Channel Swap effect. In The ColorWorks V2 Manual, on page 475, SPG demonstrates the use of the Channel Swap effect by changing a blue car... to green.
Ooer.
(Okay guys, changing it to pink too didn't fool me.)
SPG News
SPG's own website usually has something new to read or download (or both). The most recent addition is the Killer Text Effects Volume 1
which describes some pretty nifty tricks for making your letters stand out. Metallic effects, glass effects, neon effects and more. The file is a hefty 6 megabytes to download and is in .INF format (use VIEW.EXE, which comes with OS/2), plus it comes with the ColorWorks files you'll need to create the effects shown in the tutorial.
More tips to come next month.
Chris Wenham is a Team OS/2er in Binghamton, NY with a catchy-titled company--Wenham's Web Works. He has written comedy, sci-fi, HTML, Pascal, C++ and will work for tips.
 letter to the editor.
Our Sponsors: [Mt. Baker] [Post Road Mailer] [ScheduPerformance] [SPG]
 Contents |
  Previous Article | Next Article
This page is maintained by Falcon Networking. We welcome your suggestions.
Copyright © 1996 - Falcon Networking